Paramètres de l'organisation : Configuration du navigateur pour l'horodateur
Configuration, quel que soit le navigateur/plateforme que vous utilisez.
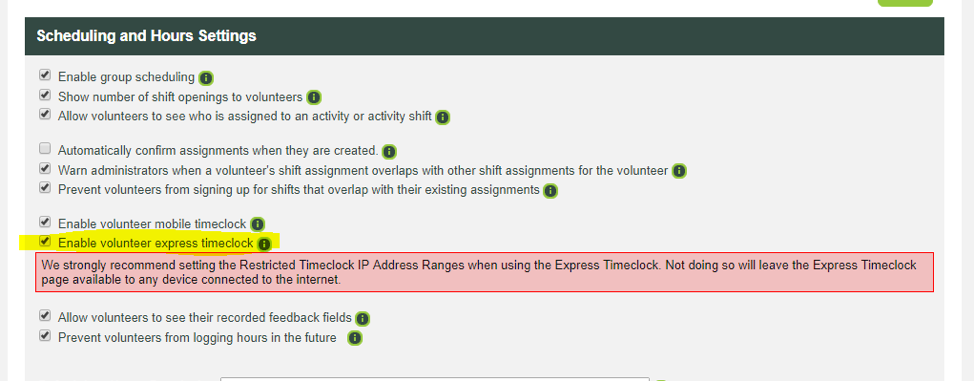
- Assurez-vous que vous avez activé l’horodateur express dans vos paramètres généraux (Configuration>>Paramètres de l’organisation>>Paramètres généraux). Ce paramètre se trouve dans la section “Paramètres d’établissement d’horaire et d’heures”.
- Nous recommandons fortement de régler les limites d’adresse IP de l’horodateur lors de l’utilisation de l’Horodateur Express. Cette restriction s’appliquera à TOUS les formulaires de l’horodateur, incluant l’horodateur régulier, l’horodateur express, et l’horodateur mobile.
- Obtenez votre URL d’Horodateur Express à partir de votre page Configuration>>Liens au site web.
- L’URL de l’Horodateur Express dépend de l’organisation, elle ne peut donc être utilisée que pour les bénévoles de VOTRE organisation. Si vous faites partie d’une entreprise, chaque compte dans l’entreprise a un lien unique
- Vous trouverez le lien de l’Horodateur Express dans la section “Liens utiles”, en bas de la page “Liens au site web”.
Windows PC
Remarque : si vous ne disposez pas d’une webcam, vous pouvez toujours utiliser la minuterie express. Vous ne serez pas invité à utiliser la caméra, mais vous verrez apparaître une fenêtre de saisie de votre nom d’utilisateur et un bouton de connexion. Les bénévoles peuvent simplement saisir leur nom d’utilisateur et cliquer sur “Connexion” pour lancer le processus de chronométrage.
Internet Explorer n’est pas pris en charge. Vous devez utiliser Chrome, Firefox ou Edge, qui sont à jour.
Il est recommandé de configurer votre horodateur en mode kiosque. Cela limitera l’accès à l’horodateur et empêchera l’ordinateur d’être utilisé pour des activités pour lesquelles il n’est pas destiné. Vous trouverez les étapes à suivre dans cet article d’aide.
Chrome
- Ouvrez Chrome et naviguez jusqu’à l’URL de l’Horodateur Express
- Chrome doit vous demander si vous souhaitez autoriser app.betterimpact.com à utiliser votre appareil photo. Cliquez sur le bouton [ Allow ].

- Pour que l’Horodateur Express soit réglé par défaut pour utiliser la fonctionnalité de l’appareil photo et code QR, il suffit de cliquer sur le bouton [Balayer le code QR]. Dorénavant l’Horodateur se servira de ce mode.

- Il passera ensuite en mode caméra et affichera ce qui est visible à l’écran.
- Les bénévoles n’auront plus qu’à placer leur code QR (soi imprimé, soi à l’écran de leur ordiphone) devant la caméra pour être automatiquement connectés.
- If you have accidentally denied access to the camera you will need to go into your chrome settings to allow it.
- Go to the menu (three dots stacked, beside the address bar) and then select settings
- Search “Camera” on the search at the top of settings. Then select “Site Settings” from the results.

- Click on the “Camera” option.

- In the “Block” section. Click the Garbage can beside app.betterimpact.com.

- Navigate back to the express timeclock url, and make sure to select “Allow” when prompted for permission to use the camera.
Firefox
-
-
-
-
-
-
- Navigate to your express timeclock url in firefox.
- You should be prompted to allow access to the camera. Check the “Remember this Decision” checkbox, and click Allow.
-
-
-
-
-

3. To default the express timeclock to using the camera/qr code functionality, simply click the [ Scan Timeclock QR code ] button. Going forward, the timeclock will remember that you have selected this mode, and will show it automatically.

-
-
-
-
-
-
- This will then switch to the camera mode and show what is visible to the camera on the screen.
- Volunteers will now simply put their QR code(either printed, or on their smart phone) in front of the camera to be automatically logged in.
- If you have accidentally Blocked the camera permissions. You will need to allow them to use the QR scanning capabilities.
-
-
-
-
-
a) Click the icon beside the address that looks like a camera with a line through it.

b) Click the X beside the “Use the Camera Blocked Temporarily” permission to unblock it.

c) Reload the page (press F5, or click into the address bar and press enter).
d) Make sure to check the “Remember this decision” checkbox and press the “Allow” button.
EDGE
-
-
-
-
-
-
- Navigate to your express timeclock url.
- At the bottom of the screen, edge will prompt you for permission to access your webcam, press Yes.
-
-
-
-
-

3. Press the [ Scan Timeclock QR Code] button.
4. If you accidently press No, or otherwise revoke access to the camera, you will need to go into the settings to re-allow it.
a) Press the menu button (beside the address bar, three dots) and select “Settings” (It is near the bottom, you may need to scroll).

b) Select “Advanced”

c) Under “Website permissions” click the [Manage permissions] button.

d) Click “app.betterimpact.com”

e) Toggle to “On” to always allow the camera, or click [Clear Permissions] to be prompted to allow the camera next time.

Tablets
Amazon Kindle Fire
Note: The Amazon kindle tablet is a very affordable option, but cannot be locked down into kiosk mode or have access restricted like a computer can. You can use parental controls to restrict access to many of the apps and functionality. We also recommend turning off all the tracking and autofill settings. These steps may vary slightly based on what version of the kindle fire you are using. They were created using the Kindle Fire HD 8.
-
-
-
-
-
-
- Open the Kindle “Silk” browser and enter your express timeclock url.
- It should request permission to use the camera, select “Allow”.
- Depending which camera you plan on using, select the appropriate camera button.
- If you accidentally deny access to the camera, you will need to go into the settings to clear that and re-allow it.
-
-
-
-
-
a) Click the 3 menu button (three lines on top of each other, on the left side of the address bar) and then select Settings.
 |
 |
b) Select “Advanced”. Then select “Site Settings”


c) Select “Camera”

d) Under “Blocked”, select “https://app.betterimpact.com”

e) Click “Clear and reset”

f) Click “CLEAR &RESET” in the confirmation that comes up.

g) Press the back button until you have return to the express timeclock page.
h) Press the refresh icon, or drag the page down to reload.
i) Press “ALLOW” when prompted to use the camera.
IPad or IPhone
Note: iOS does not allow you to save the camera permission, so you will need to allow it on every page load. (Every time the timeclock is accessed). This is a limitation in how Apple has designed its permission infrastructure and unfortunately we can’t get around it. When setting up the timeclock on an apple device, you MUST use Safari.
-
-
-
-
-
-
- Open Safari and navigate to your express timeclock url.
- When Prompted, “Allow” access to the camera.
- Select which camera you would like the timeclock to use.
- If you press “Cancel” instead of “Allow”, simply reload the page by clicking the refresh icon beside the address bar and it will prompt you again.
-
-
-
-
-
Android Tablet
Note: Android tablets need to be running at least android 4.2 to access any part of the software. Older versions do not have the security protocols necessary to communicate with our servers. Android 4.2 will allow you to login using chrome, but it does not support the camera functionality, so the express timeclock would be using the username login version. The “Internet” app, on android 4.2 does not support the security protocols necessary to communicate with our servers.
Android 9 – Chrome
-
-
-
-
-
-
- Open Chrome and browse to your express timeclock url.
- It should prompt you to “Allow” access to the camera. Press Allow.
-
-
-
-
-

-
-
-
-
-
-
- Press the [ Scan Timeclock QR Code ] button to switch to the QR code version.
- Select which camera you would like to use, if your device has a front and back camera.
- If you accidently block the camera, or need to re-allow it for any reason, you can clear the camera preferences via the settings.
-
-
-
-
-
a) In Chrome, press the menu (three dots stacked), and then select Settings.

b) Select Site Settings:

c) Select Camera
d) Select https://app.betterimpact.com

e) Select “Access your camera”

f) Select Allow

g) Tap the back button until you get back to the express timeclock.
h) Reload the page by dragging it down and press “Allow” when prompted about the camera.
[contentblock id=1]